Quest Protein Bars Review – All of them

Quest Protein Bars Review – All of them

Quest Nutrition has been one of my favorite supplement brands ever since I started weight training and being conscious of my macros/diet.  I remember the brand when it first offered protein bars, peanut butter cups, and pasta.  Now, there are so many more products to choose from, including Hero Bars, Beyond Cereal Bars, Protein Chips, and (recently) Protein Cookies.

I decided that it was time to try more of the OG protein bar flavors, as well as the newer Cereal and Hero bars, since I typically have always stuck to the same popular flavors.  Overall, I learned that the popular flavors are the most popular for good reason, but I was also pleasantly surprised with some of the other ones I had never tried before!

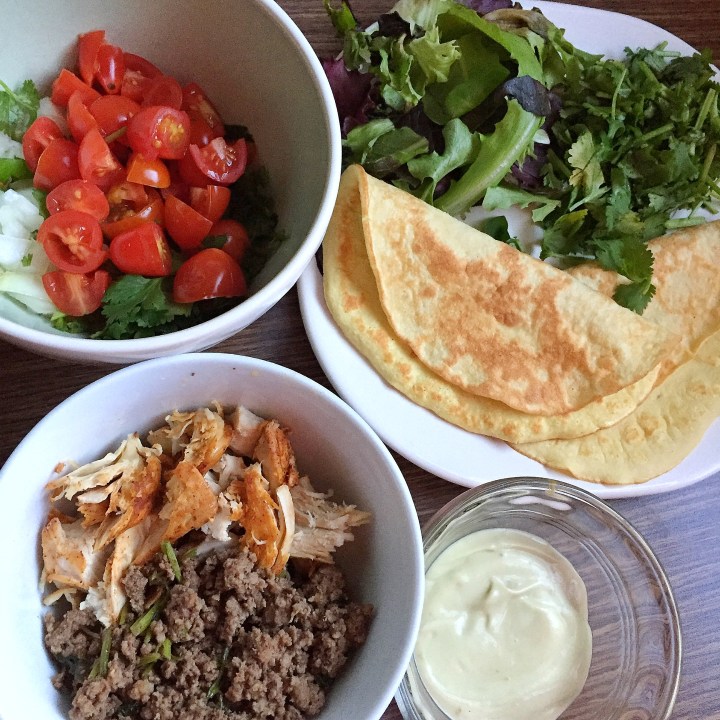
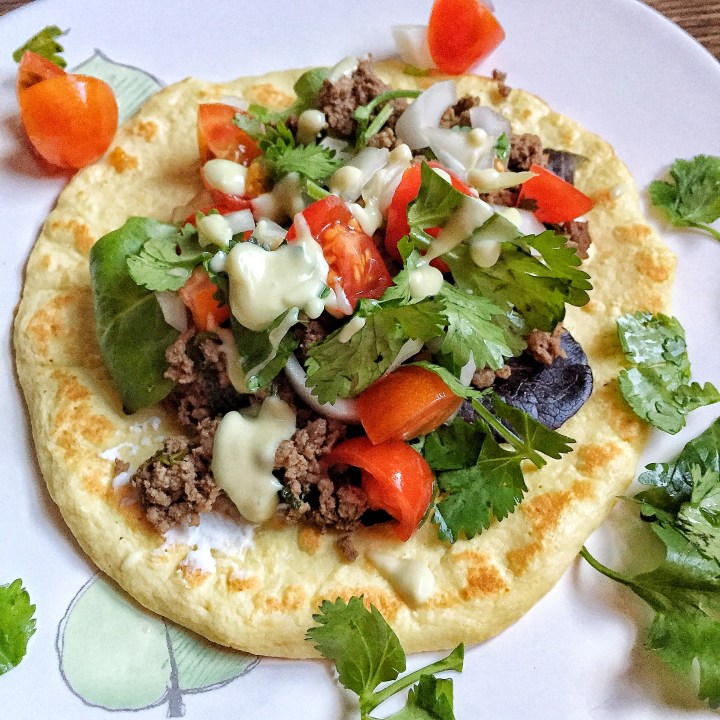
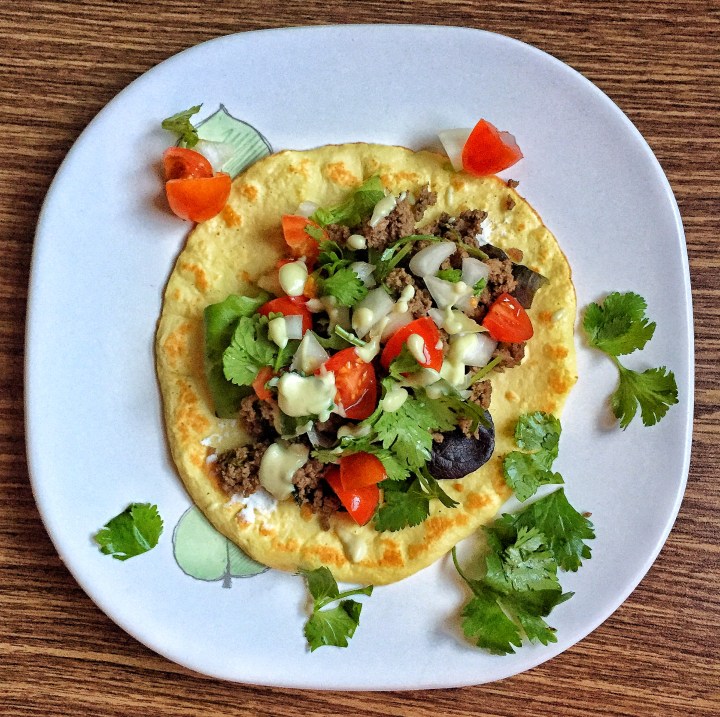
Side note: none of the photos in this post are edited at all, as I didn’t want to distort the product.

1

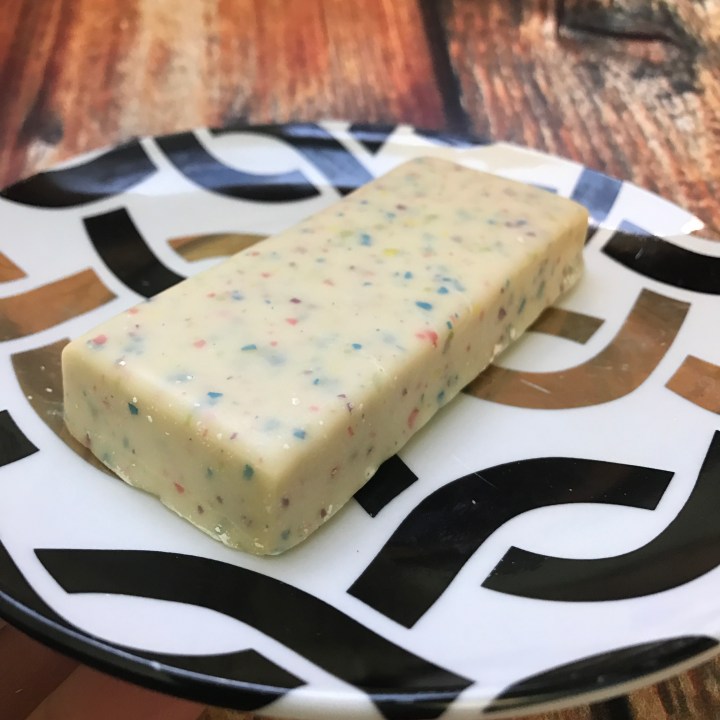
First off, I want to give a shout out to the newest protein bar flavor, Birthday Cake, which has definitely landed itself in my top 5 favorite list.  The bar itself has the same consistency of the other Quest protein bars, and is smooth (no chunks or additional texture).  It’s one of the coated bars, and the coating is speckled with funfetti.  The coating itself is pretty sweet, smooth, and melts in your mouth.

9.5

8

9

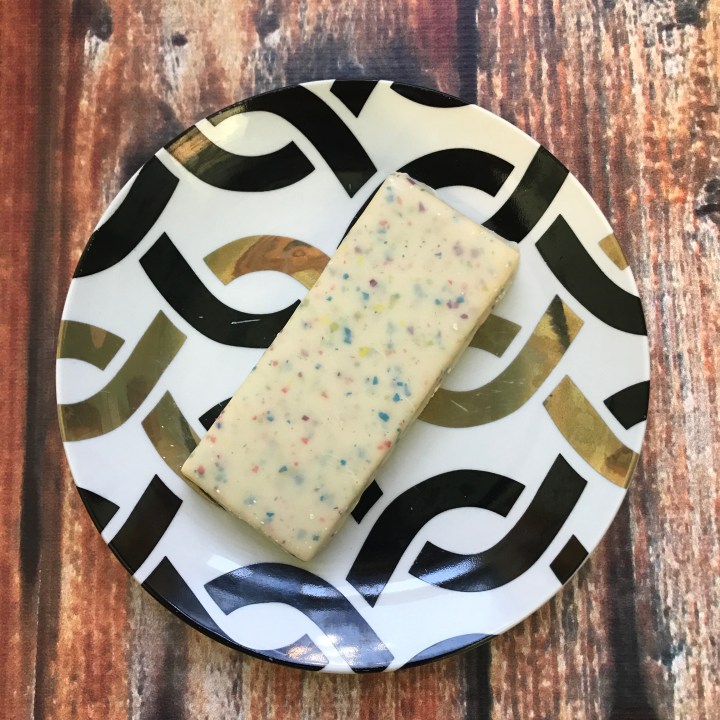
The bar itself is not nearly as sweet as the coating, and has a good birthday cake flavor.  There are some undertones and aftertaste of the erythritol sweetener, but not an overwhelming amount that takes away from the overall experience.  I definitely recommend this flavor to all of my fellow birthday cake enthusiasts, as it’s a great dessert-like item that’s very easy to fit into your daily macros!

Stats – P 21, C 25, F 5; Fiber 14, Erythritol 6, Net Carbs 5

6

Next up, I want to talk about the Beyond Cereal Bars and Hero Bars.

Beyond Cereal Bars – I was pleasantly surprised by these.  They come in three flavors – waffle, cinnamon, and chocolate.  I didn’t really like the waffle flavor, as to me it tasted the most artificial.  Each bar has 110 calories, 12g protein, 4.5g fat, and 2g net carbs.  The chocolate and cinnamon flavors are great as a snack bar on their own, but are also yummy broken up and eaten as actual cereal in a bowl with milk.  I would recommend these as a lower calorie, lower protein, quick snack bar.  The macros aren’t as favorable as the other Quest products, but I would consider them good for the occasional snack.

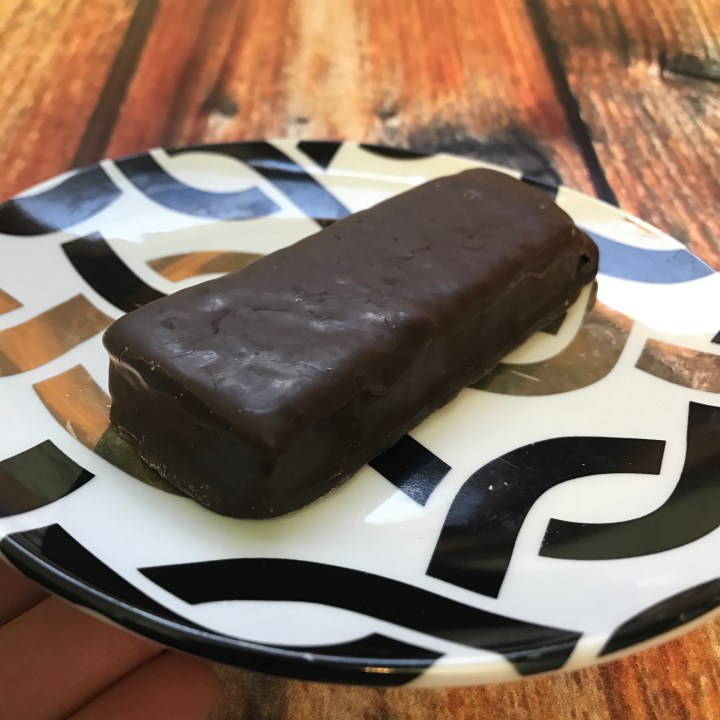
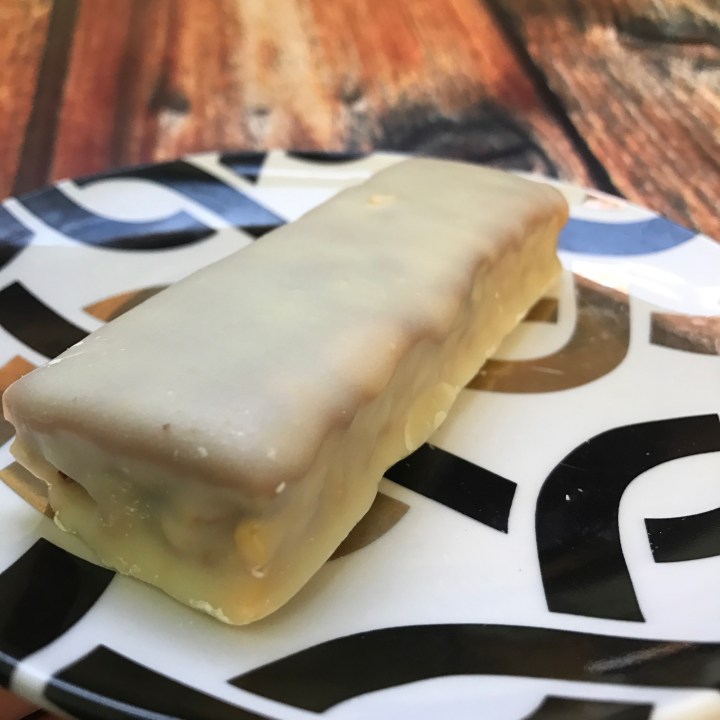
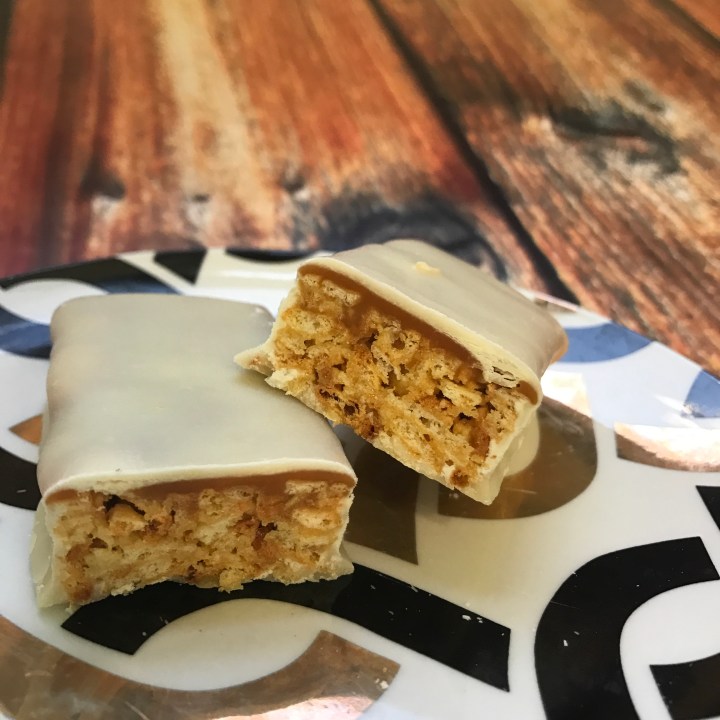
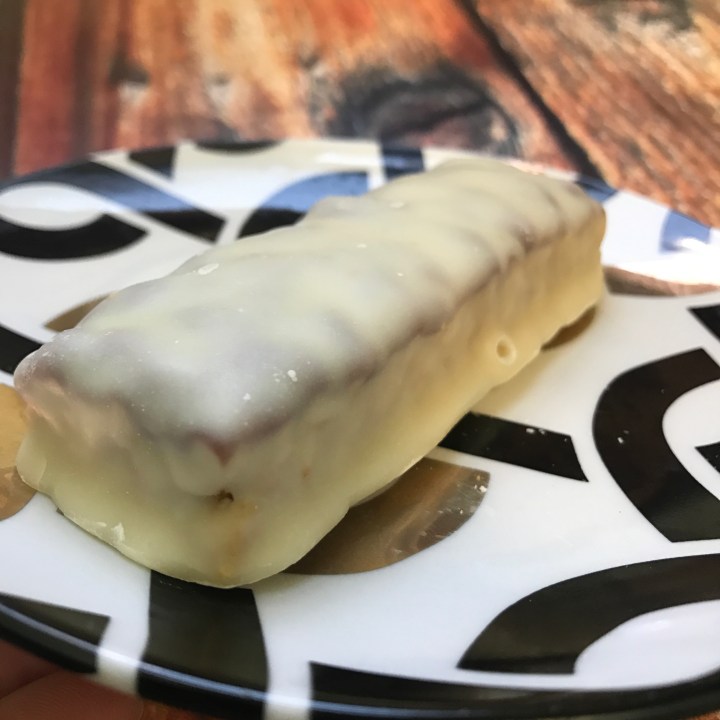
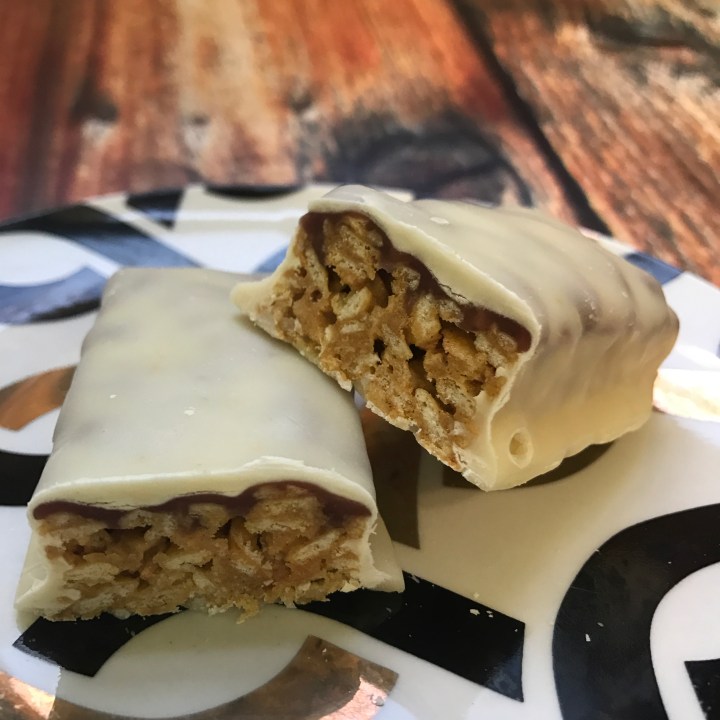
Hero Bars – I had high hopes for these because I had heard such good things about them, and was NOT disappointed.  They come in three flavors – chocolate caramel pecan, blueberry cobbler, and vanilla caramel.  All three flavors are tasty, and are very true to their names.  Also, Quest mentions use of allulose in these bars, which is a natural low glycemic sugar which is not processed by the body, but still tastes sweet, and is subtracted from the carb content to get net carbs.

2

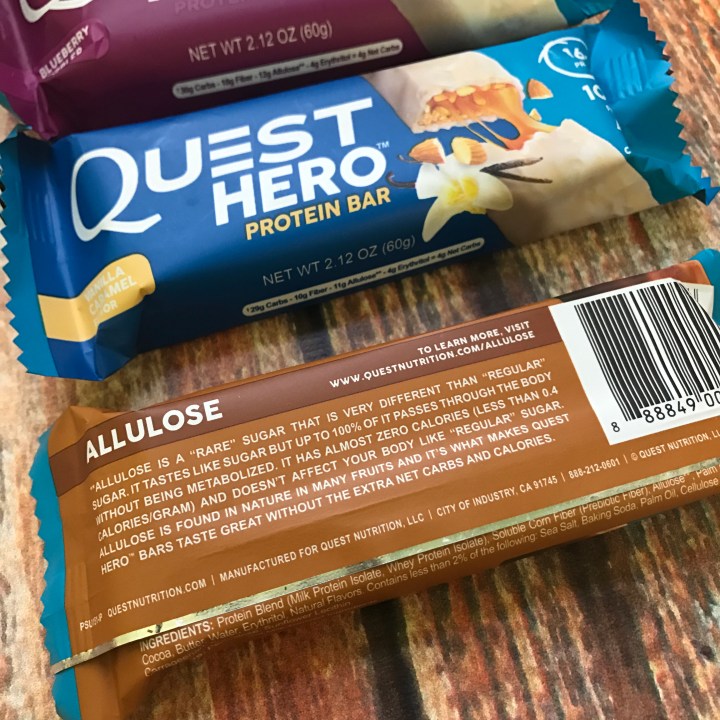
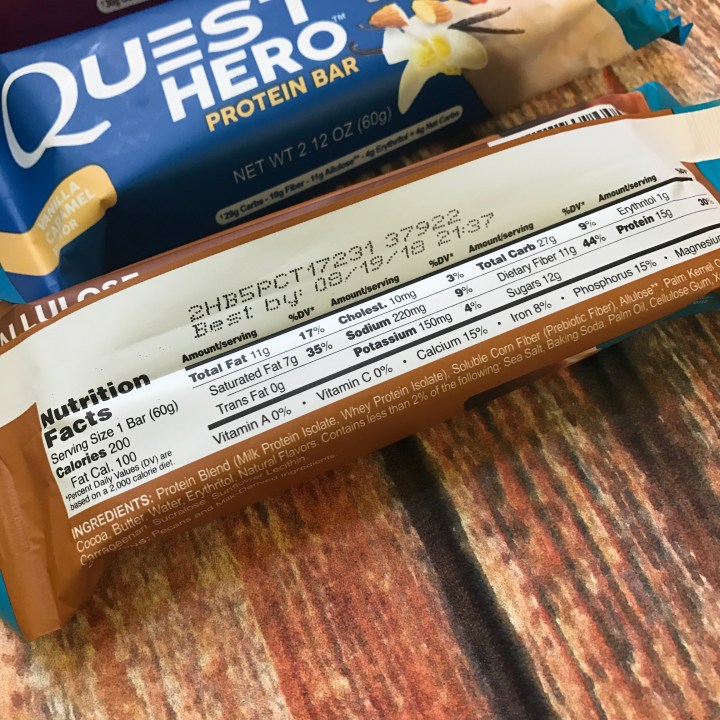
The bars are coated, and they each have a crunchy layer and then a gooey filling layer beneath the coating.  The macros of each bar are slightly different, and stats are as follows (there are also photos below):

Calories  Protein  Carb  Fat  Net Carb
Vanilla 180 16 29 9 4
Chocolate 200 15 27 11 4
Blueberry 170 17 30 7 4

Chocolate:

3

Vanilla:

4

Blueberry:

5

I think my favorite was the chocolate flavor, with the blueberry coming in as a close second.  The vanilla one was good, but had a little bit too much of an artificial flavor for my liking.  Similar to the cereal bars, the macros aren’t as favorable as the other Quest products, but these are a good dessert-like snack.

Chocolate:

12

11

Vanilla:

13

14

Blueberry:

16

17

Ok, now it’s time for a quick one-liner on each of the OG protein bar flavors.  Let’s start with my favorites, in ascending order (i.e. I like each one more than the previous one listed):

  1. Lemon Cream Pie – I was surprised that this one made it to even the bottom of the top for me because I generally don’t like fruity protein flavors, and I also don’t particularly like lemon cream pie in real life.  However, the consistency of this bar with the hint of lemon really worked
  2. Chocolate Brownie – It would be difficult to screw up anything designed after a brownie, and the only reason why this one is low on the list is because, compared with the other flavors, it’s just a bit boring.  Not a disappointment, though
  3. Double Chocolate Chunk – My thoughts on this flavor are very similar to my thoughts on the Brownie flavor
  4. Mint Chocolate Chip – Similar to the Double Chocolate Chunk and Brownie, but the addition of mint is really tasty
  5. Mixed Berry Bliss – I was surprised that this one made it so high on my list, but the berry flavor didn’t taste very artificial (which is my number 1 complaint of most fruity flavored protein bars) and the texture is good
  6. White Chocolate Raspberry – My thoughts on this flavor are very similar to my thoughts on the Mixed Berry flavor
  7. Rocky Road – There’s no universe where this could be bad
  8. Smores – See Rocky Road
  9. Cookies and Cream – I have a soft spot for anything cookies and cream.  Quest nailed it with this one
  10. Blueberry Muffin – I really wasn’t expecting to like this one, but it’s really well done with pieces of actual blueberry and also chunks of what feel like an actual muffin.  A+ for texture on this one, and the flavor isn’t artificial, either
  11. Chocolate Chip Cookie – This is the ultimate OG.  One of my first experiences with Quest products was this flavor and, like a first love, it will always have a special place in my heart
  12. Oatmeal Chocolate Chip – This wasn’t one of the original Quest flavors, as I believe it debuted mid-2016,  but it quickly became a favorite once I tried it.  There’s some seriously good texture in here from the giant chocolate chunks, and the flavor is that of yummy cinnamon oatmeal

It should be noted that some of these flavors are really elevated when microwaved for 30 seconds, or actually baked in the oven like cookies.  I would recommend trying any of your favorite Quest bars heated up to see whether you like that flavor in bar form, or hot and ooey gooey from the microwave/stove.

And now for my least favorite:

  1. Apple Pie – This was very sweet and kind of artificial tasting.
  2. Vanilla Almond Crunch – There isn’t anything really wrong with this one, but it’s a bit boring and bland.
  3. Strawberry Cheesecake – Very sweet and artificial tasting
  4. PB&J – This one has pretty decent texture with chunks of peanuts, but the flavor was just OK for me.
  5. Banana Nut Muffin – Didn’t like this one because it’s artificial tasting
  6. Coconut Cashew – I didn’t really like this flavor combination
  7. PB Supreme – This one’s not terrible, but I would expect more of a peanut butter flavored bar
  8. Chocolate Peanut Butter – Similar thoughts as the PB Supreme
  9. Mocha Chocolate Chip – I thought I would like this one, but I found the flavor to be a bit too strong, and artificial tasting.
  10. Cinnamon Roll – I thought this tasted too artificial.

There we have it!  At this point I think I’ve tried 95% of the products made by Quest, and I really can say that I’ve enjoyed most of them.  Everyone’s flavor profiles and preferences are different, so go ahead and try a flavor for yourself even if it didn’t make it onto my favorites list.  Do you have a preferred Quest product or flavor?  I’d love to hear from you, so message or comment below your thoughts!

Stay fit and #OnAQuest, all!

FYI – No Quest bars were harmed in the making of this post!  After photos, each one was packaged up in an airtight container and put into the fridge to maintain freshness 🙂

18

The Best Keto Buns

The Best Keto Buns

Being on the ketogenic diet for a little while now, bread has definitely been something I miss.  I was never a big carb person, and bread was always something I could take or leave, but I never realized how convenient bread made things.  I’ve had to get creative these past couple of months when trying to sop up the last of my runny egg, or eat a cheeseburger at a barbeque.  This past Labor Day, my parents got the most amazing specialty burger patties from the smokehouse upstate, so I decided that I wanted to enjoy a cheeseburger like a regular person, and so I committed to finding a recipe for keto bread that didn’t, frankly, suck.

FullSizeRender3

I did some research online, and found a recipe for keto bread/buns that looked really promising.  The first time I made the buns I followed the recipe exactly (because I really wanted them to work), but the second time around I experimented with different seasonings and methods.  The original website, which you can find here, was really helpful and thorough, with great tips and tricks to make sure your keto rolls come out perfectly!  You check out the website for a couple of different variations on how to prepare this recipe, but if you want to see what worked best for me and how I modified the recipe, keep reading!

The original website mentions this, and I will too – It helps to be the most accurate for this recipe, so try to measure in weight, rather than volume.  Also, the original website states that it makes 10 buns, but I easily made 12 out of the dough.  As such, the nutrition facts that I’ll mention later is reflective of a yield of 12.

With that said, let’s get started!

Ingredients:

  1. 150g almond flour (1.5 cup)
  2. 40g psyllium husk powder (2/3 cups psyllium husks or 1/3 cup psyllium husk powder
  3. 60g coconut flour (1/3 cup)
  4. 75g flax meal (1/2 cup)
  5. 2 tsp garlic powder (optional – my second time making this recipe I subbed this for nutritional yeast)
  6. 2tsp onion powder (optional – my second time making this recipe I subbed this for nutritional yeast)
  7. 2 tsp apple cider vinegar (can also use 2 tsp cream of tartar)
  8. 1 tsp baking soda
  9. 1 tsp salt
  10. Sesame seeds (Or any seeds you like. This is for sprinkling on top,  so any amount you want is fine)
  11. 6 large egg whites
  12. 2 large eggs
  13. 2 cups of boiling water

FullSizeRender (99)

Directions:

  1. Preheat your oven to 350 degrees F.  Prepare a large baking sheet (you might need two) with parchment paper.
  2. Make sure your psyllium husks are in powder form.  If you’ve purchased whole psyllium husks, blend them (I used my magic bullet) until they are a powder.  Do the same with the flax – if you have flax seeds, just grind them until they become a meal.
  3. Mix all dry ingredients (except for the sesame seeds) in a large bowl. (You can use your stand mixer’s bowl and use a dough hook to mix everything together later.  Using a rubber spatula to mix in your wet ingredients also works.)
  4. In two separate bowls, separate the egg whites from the yolks.  (In one large bowl you should have 8 egg whites, and in the other bowl, two egg yolks).  Whip the egg whites until they are light and fluffy, and have soft peaks.  In the other bowl, beat the yolks and apple cider vinegar until combined and bubbly, but you don’t have to beat them too much.  (If using cream of tartar instead of apple cider vinegar, make sure you’ve added it to the dry ingredients.
  5. Mix the egg yolks into the dry mixture.  Then add the egg whites and fold gently.  You want to mix this dough as little as possible to keep it as light and fluffy as possible.
  6. Pour the boiling water into the mixture and mix until just combined.  Don’t over mix!
  7. Once combined, separate equal sized balls of the dough and set them down on the parchment lined baking sheet about an inch or two apart.  This dough will spread, but it will also rise a fair amount, so press down the balls so they look almost like hamburger patties (I didn’t do this the first time around, and the rolls came out too spherical) 2
  8. Sprinkle sesame seeds (or whatever seeds you like) on top of the rolls, and press down so they stick.
  9. Place into the oven and bake for about an hour.  Set the tray high enough so that the bottoms don’t burn (I like to place my baking tray on the top shelf, and put another empty tray on the bottom shelf to diffuse the heat in my oven).  I also like to rotate my tray halfway (after around 25-30 minutes).  You can start checking for doneness after 45 minutes.  The thing with this dough is that it crisps nicely on the outside, and they almost seem like they are done after 30 minutes of baking, but the inside takes a little longer to cook, so trust and leave them in for at least 45 minutes as long as the bottoms aren’t burning.
  10. Once cooked, allow to cool completely before wrapping up for storage.  Wrapped in saran wrap or in an airtight container, these will last about a week, and I have been storing mine in the fridge.

(Macro information below)

FullSizeRender2

Macros per bun (yield 12) is as follows:

  • Protein – 8g
  • Carbs – 10g (3.5g net)
  • Fat – 12g

FullSizeRender

When you beat the eggs fluffy and are careful not to overmix, the buns come out light and fluffy, almost like english muffins.  They are perfect for catching the yummy yolk from your runny egg, making a sandwich, dipping into your red sauce, or just having with some butter or cream cheese!  One night this week I toasted up the bun in my oven with some parmesan cheese on it, spread some vodka sauce on top, and then topped with more parmesan cheese.  I paired this with some almond meal crusted chicken and cauliflower.  On another day, I took the roll to work and dipped it into olive oil and balsamic vinegar, seasoned with some salt and pepper.

The ketogenic diet doesn’t mean kissing your favorite foods goodbye!  I have learned that there’s a keto-friendly substitute for just about any food you love, and I’m excited to see the creative ways you use these rolls in your meal prepping!  Remember to comment/message me with any questions, and tag @liftinluxe #liftinluxe in your posts!

Stay fit and fluffy, all!

FullSizeRender5

FullSizeRender6

FullSizeRender4

What I ate in Miami

What I ate in Miami

A couple of weekends ago I visited the amazing city of Miami for the first time.  I have a friend from college who lives down there, and a couple of friends from home who visit every year, and this year I finally was able to make the trip!  I knew it would be a weekend heavier in drinking and lighter on sleep than I am used to, and it would also be a weekend off from the gym.  I decided to NOT panic at the thought of such a dramatic lifestyle change for an entire weekend, but to embrace it and enjoy myself.  As a compromise with myself, I committed to remaining keto while on my trip, which meant:

  1. Dining out required a few modification requests, and no desserts (luckily the friends I was with aren’t big foodies, so this wasn’t difficult to achieve at all).
  2. Drinking was limited to liquor, moderate wine, no beer, and no sugary chasers/mixers

3

As the other half of my compromise with myself, I committed to going with the flow, not worrying about what time I was going to sleep, not tracking my macros in my app, and generally trying to have the most fun!  I have to say, this little internal compromise was the absolute perfect balance, and really made my weekend in Miami very enjoyable.  I’m not a big drinker in general, so whatever drinking I wound up doing on my trip wasn’t enough to really throw me off track.  Not tracking my macros for the weekend was refreshing, my phone didn’t die nearly as fast as it usually does, and I just made sure to stay aware of the protein/carb/fat ratios in the things I was eating in order to stay in line with keto (and the fact that I’m a seasoned macro counter really helped with this, so don’t get too frustrated if you can’t eyeball things if you’re new to the world of macros.  It comes with time and practice!)  Lastly, one thing that we completely avoided, which also helped a lot, was getting food after our nights out.  I find that it’s the late night munchies that really throw me off the next day after being out.

12

Talk about squad goals 😉

All of that said, let’s get into where I went and what I ate during my weekend in Miami!

Friday

My flight landed around dinnertime, so I only had one meal in Miami this day.  We went to The Spillover in Coconut Grove, which is a yummy restaurant that specializes in ciders and meads.  As much as I wanted to try one of their unique meads and ciders, I settled on a glass of white wine, but stuck to something dry because there are much fewer carbs in a dry wine than a sweet dessert wine.  My friends and I shared as an appetizer the Alligator Ribs special, which came with fries and coleslaw.  I skipped the fries, had a few tastes of the alligator (which was awesome, as a side note), and had some of the slaw.  It was perfectly satisfying as an appetizer, as long as you can ignore the tempting smell of the fries o_O

1

As my main, I ordered the Yeyo Salad, which had the following menu description: Chopped romaine lettuce tossed with free-range grilled chicken, croutons, chopped bacon, shredded jack cheese, cracked black pepper and creamy garlic dressing.  I swapped the garlic dressing for Caesar dressing (on the side) after asking the waitress what the ingredients of the dressings were.  I also forgot to ask for no croutons so I had to pick them out when the salad came.  Asides from that, the salad was very keto friendly right off the menu, and was filling and delicious.

Saturday

Friday was a late night, and Saturday was a late morning, so for our first meal of the day we wound up getting brunch at 1 PM at Eating House in Coral Gables.  It wasn’t a boozy brunch for me at all, but I did have some coffee with cream.  The table ordered tater tots, maple candied bacon, and cap’n crunch pancakes to share, and I sadly couldn’t participate.  I did have a piece of the bacon, and am honestly not sure how much sugar was actually on it, but it was delicious.  As my main, I got the Carbonara Eggs Benedict, and the menu description was: soft eggs, bacon, black truffle, grana padano, toast.  Before going to the restaurant, I looked up the yelp page to see what I was working with (something I always do prior to visiting a restaurant) and I noticed that there was something that looked like breadcrumbs in the photos of this Benedict dish.  When I ordered, I asked the waitress about what they sprinkle on top and she confirmed that they do add breadcrumbs, so I ordered the dish sans-breadcrumbs, and sans-toast.  The waitress was unsure of my decision, but I went through with it anyway, curious to see what low carb eggs benedict would be like.  It was covered generously in a creamy grana padano sauce, so it was definitely filling enough without the toast, and it was served in a deep dish so it was easy to eat without the toast as well.  Overall, it was a great decision to have something savory for brunch (as opposed to the pancakes or waffles I probably would have ordered instead), because the healthy fats and minimal sugar kept my head clear, and didn’t make me sleepy all afternoon.  Also, not having the toast was a great decision because I didn’t feel overly full and bloated afterwards.

4

6

We took a ride into Wynwood later in the afternoon, walked around town, and saw the Wynwood Walls.  For a late dinner, we went to the Wynwood Diner.  I ordered a Diet Coke with my meal because I wanted something a little sweet and bubbly, and as my main I got the Cobb Salad: iceberg, avocado, tomato, egg, grilled chicken, bacon, gorgonzola, served with a red wine vinaigrette.  I opted for regular vinegar instead of the vinaigrette, but asides from that I didn’t modify this dish.  Unfortunately the restaurant was very dimly lit so I didn’t photograph this one, but the portion was massive and all of the ingredients were fresh and delicious, so I enjoyed this meal a lot!

7

11

Sunday

We didn’t have much time to do anything except for breakfast on Sunday before our flight, but we still had an amazing breakfast at Havana Harry’s in Coral Gables.  The portions at this Cuban restaurant are immense and the food was really good.  I got the spinach and goat cheese omelet with a side of tomatoes instead of potatoes.  They were generous with the goat cheese to say the least, and this was the perfect meal to end the weekend.

8

Concluding Thoughts….

Eating keto while away was all around the best decision.  It made me eat less overall (i.e. no toast at brunch, and not participating when everyone is sharing something like fries and pancakes), which obviously led to less calorie consumption but also made me feel better in general.  It also caused me to choose more healthy meal options, because there are only so many options to choose from that can be modified into a no carb meal.  When it comes down to it, some dishes just won’t work, no matter how much you try to modify!  For example, you can’t modify a waffle or dish of pancakes to be keto friendly, but you can modify an egg dish to suit your needs.  In choosing the eggs, you might be eating the same number of calories, but you’re eliminating the sugar and adding healthy fats.  I find that the menu options that can be modified into keto friendly meals are generally the more healthy options to begin with.  And, when all else fails, SALAD!  You can literally build any salad you want at virtually any restaurant, and this will always be a savior for anyone counting their macros.

What are your go-to meals when eating out at restaurants, and what are some of your vacation hacks for staying on track? Let me know in the comments! 🙂

Stay fit and fresh, all!

2

10


Coconut Butter Keto Cups

Coconut Butter Keto Cups

Now that I am full force keto and have been practicing this diet for a month officially, I have a pretty good idea of the highs and lows of the diet, and the areas I have struggled with along the way.  It’s been quite a journey, and I think my body is finally fully adjusted to the lifestyle change.

I have always considered myself a “clean” eater, but I’m also a big proponent of balance in all aspects of life, especially in diet and nutrition.  Attempting keto was the first time that I actually tried to limit the things I am allowed to eat in a very strict way.  Prior to keto, I would indulge in occasional sweets, ice cream, and baked goods (I love cookies, and I also love to bake!)  I will be honest, the longer I stayed away from sweet things, the less I craved them, and I found that when I would have a sweet sugar-free indulgence, it would set off a world of other cravings.  After looking into this a bit more, I learned that anything sweet, whether it has actual carbs or not, sets off the same pleasure centers in the brain.  Therefore, even if you are eating something that is sweetened with stevia instead of cane sugar, you will remain in ketosis (if done in moderation) and there won’t be much of an effect on your glycemic index, but you certainly won’t kick your sugar cravings.  So, I’m prefacing this post with an emphasis on moderation! (What else is new, amirite?)  If you are keto like myself and are truly trying to kick your sweets addiction, it probably isn’t the best idea to pound keto cups sweetened with stevia, or even have them too readily available if it’s towards the beginning of your journey and your will power isn’t yet fine-tuned (speaking from experience).

8

That being said, I do think it would be infeasible for me personally to give up sweets indefinitely.  In fact, to commit to such a thing would probably cause me to subconsciously put a limit on how long I even want to remain on the keto diet for.  I have thus far found it pretty difficult to find low carb or sugar free versions of regular sweets (i.e. chocolate bars and baked goods) without them being explicitly marketed as a keto product.  I’ve stumbled across a few interesting keto brands that I have yet to try, but they are certainly on my list!  I decided that since I couldn’t find a convenient product at my regular grocery store, or regularly available online, I would start to experiment at making my own.

6

I’ll be honest, I’ve tried and failed a number of times already at creating a tasty treat worthy of sharing with you guys, but I think I really nailed this one.  I made coconut butter keto cups, inspired by the Eating Evolved Keto Cups (which I love, but are unfortunately often out of stock).  I did use stevia to sweeten up the chocolate in these cups, and I added some vanilla and cinnamon to the coconut butter for an extra punch of flavor.  These were so easy to make and came out so yummy that I would prefer to just make them myself, since it’s not only cheaper to do so, but you can also customize them however you like!  I’m thinking for my next round I’ll try to incorporate MCT oil, I’ll use more coconut butter (to even out the chocolate to coconut ratio), and I’ll add nuts and spices!  Stay tuned for updates, but for now here’s the original recipe:

Ingredients (this recipe makes 4 keto cups)

  1. 4 tbsp cocoa powder, unsweetened
  2. 4 tbsp coconut oil, liquified
  3. 1 tsp stevia
  4. Pinch of salt
  5. 4 tsp coconut butter
  6. Cinnamon (to taste)
  7. A dash of vanilla (seriously a small amount, like less than 1/8 tsp
  8. Coconut flakes, or whatever toppings you like (optional)

1

Directions

  1. Prepare a muffin tin with 4 cupcake liners. (I have silicon individual cupcake molds so I just used those and set them into a glass baking dish for convenience)
  2. Mix together the coconut oil, cocoa powder, stevia, and salt in a small bowl.
  3. Spoon less than a tbsp of the chocolate mixture into the cupcake liners and place in the fridge.  After about a minute, take them out of the fridge and ‘swirl’ them to try to get the chocolate to stick to the edges of the liners.  This will help to hide the coconut butter layer later.  Place back into the fridge to fully set.  2
  4. While the first chocolate layer is setting, in a small bowl mix together the coconut butter, cinnamon, and vanilla.
  5. Remove the muffin liners from the fridge once set (should only take a few minutes) and spoon 1 tsp of coconut butter in the center of each cup.  Use your spoon to flatten the coconut butter into an even layer that almost, but doesn’t quite, touch the edge of the cup. 3
  6. Pour evenly the remaining chocolate mixture into the muffin liners.  Feel free to tap the muffin tin or use a spoon to even out the chocolate so it covers the coconut butter completely and evenly.
  7. Feel free to top the cups with coconut flakes, nuts, chia seeds, sesame seeds, or any other topping you think would be yummy.

7

I would love to experiment with different toppings and fillings for this recipe, as well as different ways to season the chocolate mixture.  Mexican spicy chocolate with raspberry flavored filling, anyone?

I’m super excited for the possibilities, and to hear your ideas as well!  Leave me a comment or message on Instagram @LiftinLuxe #LiftinLuxe with your thoughts, I’d love to hear from you!

Stay fit and flavorful, all!

4

Keto Tacos

Keto Tacos

You already know how much I love tacos.  “But Madeline, you can’t have tacos on a keto diet! Carbs!”  Yes, you’re right – I certainly can’t have the conventional Mexican meal with beans, rice, and tortillas.  What I won’t do, however, is give up tacos entirely, and so I set out to look for a way to make one of my favorite meals fit into my new diet (without having to completely deconstruct it and only eat the insides).

As it turns out, which I figured it would, there are a bunch of low carb and keto friendly options for all the taco lovers out there.  Replacing regular flour with almond flour or coconut flour in a taco shell recipe is a popular low carb alternative (which is what I did in my homemade taco post a few weeks ago).  I wanted to take it a step further, though, and make a truly keto friendly taco shell without using any variation of flours.  Here’s how.  Get your pen and paper ready for this long and complicated ingredient list:

Ingredients (taco shell): 

  1. Cheddar cheese, shredded (I used one serving, 1/4 cup, per taco shell)

Directions: 

  1. Preheat your oven to 400 degrees F
  2. Line a baking sheet with parchment paper
  3. Take 1/4 cup of cheddar cheese and dump it onto the parchment paper.  Spread it out so that it makes a circle the size you’d like your taco shell to be.  Try to make it so that there are as few gaps and holes as possible, because this will make your assembled taco less messy later.  1
  4. Arrange as many tacos on your parchment lined baking sheet as you want, making sure there’s about an inch between each one, as they will spread a little bit.
  5. Bake the cheese for about 12-15 minutes or until melty, bubbly, and gets a nice golden toasty color. 2
  6. Remove the sheet from the oven and allow the cheese to cool and set for about 10 minutes.  You’ll know it’s set enough when you can get a thin spatula underneath it without the cheese being so gooey that it breaks apart.  Play around with it when lifting it off the parchment, and be careful because you don’t want to tear your taco shells! (I used a metal cookie spatula for this because it’s thin and sharp enough to remove the cheese from the parchment without stretching it or breaking it.)  Don’t let it cool completely while lying flat, though, because….
  7. When the cheese has set enough to get it off the parchment, transfer it onto something that will allow it to hang and fully set into the desired taco shape you want it to be in.  I wrapped mine around a small bottle of vinegar that I had.  You can also suspend a ruler across two cups and drape the shells over the ruler.  The shells might drip some grease, so put something underneath them so your countertop doesn’t get too messy.  5
  8. While you wait for your taco shells to set, prepare your fillings.  I sliced some cherry tomatoes, avocado, and spinach, diced a chicken thigh, and spooned some sour cream on my plate. 3
  9. Once the taco shells hold their shape, assemble and enjoy!

Does anyone have any other keto tips to share with me?  I would love to hear from you guys!  Leave me a comment or an email at LiftinLuxe@gmail.com!  Also, please tag me in anything you make that my site inspires!  @LiftinLuxe #LiftinLuxe.  I’d love to see your creations 🙂

Stay fit and flavorful, all!

4

6

7

8

Days 4-7 on Keto

Days 4-7 on Keto

If you follow me on Instagram or read my latest post, you’re definitely very well aware that I am a couple of weeks into the ketogenic diet, and am totally loving every avocado filled minute of it!  In that first post, I explained a bit about what the ketogenic diet is, and some of the benefits of following it.  I also told you not to pass judgment on the diet just from hearing about my first three days experience, and to stay tuned to hear about the rest of my first week.  (PSA, apologizing in advance for the not cute photos in this post.  It’s pretty difficult to glam up my tupperware lunches that I bring to work, especially when they have mushy avocado all throughout.)  As a quick recap of my last post, by the end of day 3 my ketone levels were “trace,” which was a step above average levels.  I was tired, I had body aches, and come-and-go headaches.  Sounds like fun, right?  It was a no-brainer that I had to keep going, so let’s see how I fared for the rest of the week!

Day 4

When I woke up this morning, my ketone levels according to the ketone strips I bought was between small and moderate.  My body felt completely normal again,  so my headaches and body aches went away.  It was my day off from the gym, so I got to sleep in before going to work, and I wasn’t tired at all when I woke up (which was somewhat surprising, because it was my first day back after a five-day July 4th holiday).  My head felt very clear all day.  I intermittent fasted, so my first meal was at 1PM.  I made myself a cold avocado, tomato, and mozzarella salad that I brought to work, dressed in olive oil.  I also had a snack of pecans on the side of my lunch.  This kept me full all the way until dinner at 6:30 PM.  For dinner I made myself zoodles with homemade pesto (basil, olive oil, and parmesan cheese), and some dark meat chicken.  As a bedtime snack at 9 PM I had some brie cheese.  Overall, this was a very good day.  My energy and focus at work were above average, and I didn’t get my normal afternoon munchies.

3

Day 5

This morning I tried a fasted workout, which was a huge fail.  I usually do a fasted workout in the morning before work, but I also usually have BCAAs along with it which helps with hunger and energy.  About three quarters of the way through this workout I just about KO’d.  I’m not exactly sure what made this workout so difficult, but I’m sure it was a combination of it being my first ever truly fasted workout attempt, and also the first morning workout attempt since coming back from the July 4th holiday.  Either way, I called it a loss and left the gym early.  When I got home around 7:50 AM I had a snack of cottage cheese (so I did not intermittent fast today) and almost immediately felt so much better and full of energy.  This morning at 10:30 AM I also had a matcha latte made with almond milk and a splash of heavy cream.  For lunch at 2 PM, I had a cold salad of zucchini, mozzarella cheese, and avocado dressed in olive oil and liquid aminos.  For dinner, I had scrambled eggs cooked in butter with mozzarella cheese and some more brie.  I noticed as I was leaving work today that I was getting some cramps in my leg muscles.  After asking a friend, who is a seasoned keto survivor, and doing some more independent research, it turns out this diet results in the body retaining less water, which means we can become depleted in electrolytes.  On my way home from work I stopped into my local health store and bought potassium and magnesium supplements.

4

Day 6

I woke up this morning not hungry at all, and I attempted another fasted workout (but this time brought some pecans to the gym with me in case of an emergency.  I wound up not needing them, though, as my body handled my fasted workout much better this morning than the previous morning.  My muscle cramps went away, and I was left with some residual soreness, but nothing at all major or similar to the cramps I was experiencing the day before.  I intermittent fasted today and had my first meal at 1:30 PM of scrambled eggs with mozzarella cheese, some breakfast sausage, some avocado, and (decaf) coffee with a splash of heavy cream.  For dinner at 8 PM I made myself some zucchini “nachos” which were basically thinly sliced zucchini baked in the oven and topped with mozzarella cheese, tomatoes, avocado, olive oil, and a bunch of delicious seasonings.  As a bedtime snack at 9:30 PM I had some pecans and cottage cheese.  My energy and focus today were absolutely amazing, and my hunger levels were pretty low.  Also, right before going to bed my ketones were at a moderate level, which was the most they have been all week!

8

5

6

Day 7

This morning was the first morning waking up feeling totally normal.   All of the residual side effects of my glucose detox have gone away, and tracking my macros and preparing my meals feels like second nature.  I am definitely proud of myself for not only sticking to such a restrictive diet for a full week, but also detoxing my body of sugar in the process.  I realized that this week I hadn’t even eaten any packaged goods or supplements like BCAAs and protein powders, since I didn’t really feel a need for them.

7

I would definitely recommend checking out my previous post for a ton of things I learned during my first three days on keto, since I learned the most during those first experimental days.  Towards the middle of the first week there was definitely a light at the end of the tunnel of side effects that started during the first few days.

The second week, which I am just finishing up as I write this post, was significantly easier than the first, and I was consistently amazed at how well this diet keeps me full and energized for hours on hours.  I intend on keeping up with the diet for as long as I can, and hopefully see if I can incorporate some sort of occasional cheating with carbs, in an effort to make it more sustainable in the long run.  If anyone has any experience on keto and incorporating cheat days, please comment or message me!  Until then, stay tuned because I already have a TON of keto friendly recipes to write up 🙂

Stay fit and fresh, all!

1

My First 3 Days on Keto

If you’re following me on Instagram, you might know that I recently started the ketogenic (keto) diet.  I had been thinking of trying this diet for a while now, but was never able to jump on board with its restrictive nature.  I am all about balance, especially finding the balance in a nutrition plan to incorporate all foods that you want to eat.  However, after doing some more research about the keto diet and reading a few articles that particularly caught my interest, I decided to take the plunge and give it a try.

What is the ketogenic diet?

Boiled down to the very basic of basics, the ketogenic diet is one in which you eat very few carbs (ideally 20g net per day, or 50g total), moderate protein, and high fat (>70% total daily calories).  Normally, the body uses the glucose it produces from carbs as a source of energy, because it is a quick and easily created source of sugar.  The body can alternatively use ketones for energy when glucose is in short supply, and these are produced from the breakdown of fats by the liver.  The goal of the ketogenic diet is to put your body into a state of ketosis, in which it is consistently producing ketones, and actually prefers to use ketones for energy instead of glucose.  Since ketones are produced by breaking down fat, your body looks towards your diet for fats it can use to produce ketones, but also to the fat you already have stored on your body.  This is why fat loss is a typical benefit of the ketogenic diet.  Other rumored benefits include stabilization of blood sugar, a decrease in sugar cravings, increased mental focus, and clearer skin.

My personal decision to try keto…

I think that one of the main reasons I recently have been seriously considering trying keto was that my regimen at the time (high protein, moderate carbs, low fat) was starting to feel very unsatisfying.  I tend towards low blood sugar, so I often feel insatiably hungry, but I was also starting to have unique cravings, mostly for fatty things.  And I wasn’t simply craving greasy foods, but I wanted nuts, avocados, and red meats – things I historically don’t enjoy indulging in.  I had to assume that my body needed something I wasn’t giving it enough of, namely healthy fats.  Also, the keto diet claims to stabilize blood sugar, so I thought maybe I could get those hunger pains under control once and for all!  Once I started doing more reading on the diet, I learned that it is known to increase energy/brain function throughout the day, and who doesn’t want to be more energized and productive?  Lastly, I have always been curious about how the keto diet would affect my body fat percentage and in general the way I look.

Once I had done the research that I considered to be sufficient, I started to get really excited about starting up.  I always enjoy a good challenge, and to say this would be a challenge is an understatement! The keto diet basically broke everything I understood to be true about nutrition, and it was almost the exact opposite of how I had been currently eating.  My entire grocery list would need to be revamped, and I’d have to figure out a whole new store of recipes.  Challenge accepted!

I decided to start on a Monday, and I had three days consecutively off from work (for the July 4th holiday), so I figured that would be enough time to get through the first few days of side effects while I was in the comfort of my own home.  And, I had a bacon egg and cheese bagel the day before (Sunday) so I felt as though this was the absolutely correct decision to make the Monday after.

Day 1 – Monday

I woke up this morning super excited, not only because I had the day off from work, but also because I had resolved to commit to a very involved and challenging nutrition regimen.  In addition to adopting the keto diet, I also decided that I wanted to try intermittent fasting as many days as possible.  For me, this meant choosing a roughly 8 hour window in which I would eat, and the other 16 hours I wouldn’t consume any calories to allow my body to process whatever I had previously put into it.

I wasn’t feeling too hungry, and hadn’t gone to the gym in the morning, so I wanted to try intermittent fasting on this first day.  My fridge was completely empty, so I went to the grocery store to stock both my fridge and pantry with keto friendly food and snacks.  Here’s what I bought:

  1. Eggs.  Lots of them.
  2. Avocados.  Lots of them.
  3. Chicken thighs
  4. Grass fed butter
  5. Brie cheese
  6. Mozzarella cheese
  7. Monterey jack cheese
  8. Cottage cheese
  9. Mini cucumbers
  10. Fresh baby spinach
  11. Lettuce
  12. Pecans
  13. Olive oil

groceries

I had my first meal at 1:30 PM and it was: 2 eggs, 1 oz monterey jack cheese, 100g avocado, and 14g (1tbsp) butter.  I also added salt, because I read that this diet tends to dehydrate you, and you should add salt to your food for electrolytes.  You don’t need to tell me twice to eat salt, so I seasoned to my heart’s content.  This was my first time eating butter and cheese in my eggs in YEARS and omg was it delicious.  It was like flavor overload.  It did feel heavy, though, and I almost couldn’t finish it all (and if you know me, you know how uncharacteristic this is).  As soon as I was done eating I was very aware of how full I felt, and wondered if I’d be hungry again in an hour, like I typically would be after a meal.

day 1 meal 1

Well, I was full for HOURS.  I did some chores and went to the gym for an incredible lift.  I didn’t need to eat again (not even a snack) before the gym, and my next meal wasn’t until 6:30 PM.  I made myself a salad with 100g of spinach, 100g cucumber, 100g avocado, 1 oz monterey jack cheese, 1 oz pecans, 1 tbsp olive oil, and 1 oz of brie on the side.  Added salt to this as well.  This was also as filling as it was tasty, and kept me full until my 9:30 PM bedtime snack of 1/2 cup of cottage cheese.

day 1 meal 2

Overall, this day wasn’t bad.  I wasn’t hungry at all between meals, food felt a bit heavy, and by the end of the day I was really tired.  I went to sleep pretty early in the hopes of sleeping off the grog.

Day 2 – Tuesday

Another day off from work, because it’s the Fourth of July!  And what better way to spend the holiday than planning out your meals for your new diet?  I intermittent fasted again today so I had my first meal (snack?) at 1 PM of 100g of a bratwurst.  Surprisingly, just that one sausage made me feel full and I didn’t have the urge to have another, or to keep snacking.  The brat held me until dinner, which was at 5 PM.  I put 100g BBQ’d skirt steak in a salad of 100g spinach, 100g cucumber, 100g avocado, 1 oz monterey jack cheese, with 1 tbsp of olive oil.  Meals today felt less heavy, but I wasn’t really feeling too great all day.  I had a headache and in the afternoon before dinner I was exhausted.  I actually reclined in my lawn chair and fell asleep for a bit outside.  I had a snack before bed at 9:30 PM of 100g avocado with a drizzle of 1 tbsp olive oil, 1 oz pecans, and 1 oz brie and was satisfied.  I spent some time logging my meals for the next day in my app, and then went to sleep pretty early.

day 2 bedtime snack

Day 3 – Wednesday

Last night’s time spent planning out my meals for the day went out the window when I woke up at 5:30 AM (on another day off from work, so I did NOT need to be up this early) and felt too awake and alert to fall back asleep.  I layed in bed trying to go back to sleep until around 7, but wound up getting out of bed because I was starving.  I ate breakfast at 7:30 AM, so I did not intermittent fast today, of 100g avocado, and 1 egg cooked in 14g (1 tbsp) of butter.  I’m still not sure why, but today I was consistently a little bit hungry all day.  I had a snack at 12:30 PM of 1/2 cup of cottage cheese and 1 oz pecans.  I had dinner at 5:30 PM of 100g leftover skirt steak and 50g leftover bratwurst in a salad of 100g spinach with 1 tbsp olive oil and 1 tbsp parmesan cheese.  I had 100g avocado at 10:00 PM as a snack before bed.  Overall, this day was not extremely pleasant.  My mouth was dry, and I tracked my water all day to make sure I was getting enough (my goal was 1 gallon for the whole day).  I also had some muscle aches, which I read could be a symptom of dehydration and lack of electrolytes.  Today I also bought ketone strips to test the level of ketones in my body, and in the early afternoon my levels were “trace.”  By mid afternoon, I had drank most of my daily water goal, I was feeling less sleepy because of my snack, and the muscle aches had subsided a bit.  By the time I went to sleep my ketone levels were “small,” which is one step up on the scale from “trace.”  This was my first physical sign of progress (asides from my keto flu symptoms) so even though I wasn’t feeling so great, I was still pretty excited!

Before you decide that I’ve made an awful decision…

These three days sound terrible, right?  Headaches, muscle aches, fatigue… What was I thinking?  Well, before you let this write-up deter you from even considering this diet for yourself, rest easy knowing that it’s currently Saturday afternoon (day 6 of the diet), my keto flu symptoms have completely subsided, and I’m feeling great!  My next post will detail days 4-7 of my first week of keto, so stay tuned for that before drawing conclusions based on my experiences.

Lastly, here’s a few keto tips I’ve picked up on so far from my experience

  1. Do your research prior – I generally go overboard on research before I start something new.  That said, it’s definitely good to thoroughly understand a thing that you decide to participate in, especially if it involves health and nutrition.  There are things you’ll need to know and understand in order to make sure you’re doing the best thing for your body, since every single person is different.  Also, it’s good to understand the rules of the game, this way you’re not in the grocery store every minute googling ‘is [food item] keto friendly?’
  2. Know the symptoms and side effects – This goes hand in hand with doing your research, but it really helped that I got myself familiar with the side effects and symptoms of transitioning into this diet.  It made me way less nervous when the symptoms started to affect me, and it also kept me motivated because it meant I was on the right track (even though the symptoms were unpleasant)
  3. Get the test strips – It’s nice to see your progress in front of your eyes.  Again, do some research.  These test strips aren’t 100% accurate, and your results will vary depending on different factors (how much water you’ve drank, when you last worked out, what time of day it is, etc..)
  4. Log your meals and track your macros – With a diet like this, it’s incredibly important to know exactly what you’re putting into your body.  Your macro ratio has to be favorable for achieving ketosis, and in my opinion you need to count macros to achieve this.
  5. Log your entire day’s meals ahead of time – Especially in the very beginning.  Counting macros is a tedious process if you aren’t used to it, and it becomes even more tedious on this diet because you can’t easily borrow across the macro categories.  You need to hit your targets without going over your carbs, and it’s a game of Tetris to get you there.  It helps to log everything in advance, because if you don’t you’ll likely end up in a situation where it’s dinner time and you have 5g protein left, you’ve already gone over carbs, and you have 67g of fats left.  You could make yourself one lonely egg swimming in a pool of butter… or you could plan ahead and avoid this whole situation in the first place.
  6. Maintain flexibility – Don’t let the stigma on fat get into your head.  If you’re hungry, please eat.  Count your macros to make sure you’re at a comfortable number of calories.  But if you’re hungry and all that fits in your macros is half an avocado, then by all means eat it guiltlessly.
  7. Drink a TON of water – I can’t stress this enough.  A lot of the keto flu symptoms can be greatly reduced by just staying hydrated.
  8. Salt is your friend – I will be talking more about electrolytes in my next blog post (detailing the remaining days of the first week of keto) but it’s really important to make sure that, as you hydrate, you’re also replenishing your electrolytes.  Sodium is important, and it’s easy to get this by simply salting your meals.  I learned later that other electrolytes I was likely deficient in are potassium and magnesium, so I got supplements for those at my local health store.
  9. Do it on a weekend – Or whenever you have a couple of days off from work, if possible.  There are symptoms that you will deal with, and it’s a lot easier to deal with them if you are in the comfort of your own home.
  10. Stick to it – Achieving ketosis can be finicky, and the last thing you want is to do all of this and not actually achieve ketosis because of a small evening affair with some Oreos.

This has been a really long post, and there’s even more I could have said!  As always, DM, comment, or email me any questions you have! Stay tuned next week for a post detailing the second half of my first keto week!  (Also, while the rest of my family was sipping yummy summer cocktails, I made myself a refreshing keto friendly mocktail on the Fourth of July made with water, lemon juice, lime juice, and a splash of seltzer.  Yum, right?  It’s pictured below.)

Stay fit and fatty, all! 😉

fourth of july drink

Dr. Smood NYC

Dr. Smood NYC

I am always looking for new, trendy, and healthy places to grab a bite in NYC, and when I find a good one I can’t wait to tell all my friends about it!  I recently found a Well + Good article about a new cafe in the city, Dr. Smood.  With the tag line “Smart Food for a Good Mood,” I was immediately intrigued.

1

2

7

The sparknotes of the Well + Good article that so caught my attention basically explained that a Danish couple, frustrated by the lack of healthy grab-and-go eateries, decided to open their own in Miami, and worked with the holistic nutritionist and healer Dr. Etti-Zion to develop the menu.  They developed a spread of items that was anti inflammatory (80% plant based), organic, and nutrient dense.  The entire menu is dairy free, and each location makes its own nut milks.  The coffee is made with white coffee beans, which means the beans are lightly toasted instead of roasted, which results in a cup of coffee that’s higher in antioxidants and lower in acidity.  Lastly, the sandwiches are made with a special ‘performance bread’ made with only four ingredients (millet flakes, spelt flour, water, and salt) that doesn’t spike your blood sugar and is low carb.  This keeps you full longer, provides consistent and stable energy, and doesn’t put you into a food coma.

8

3

Since I don’t generally eat sandwiches or wraps, it was the homemade performance bread that won me over and I decided that I absolutely had to visit Dr. Smood.  Literally on my next available day off from work, I headed into the city for an early, healthy, and satisfying dinner.  When I arrived, I was immediately happy with the vibe and the mood.  The music playing was trendy and upbeat, but not so loud as to be distracting, and there was a wide variety of customers ranging from business people grabbing a quick bite to people sitting in the corner reading a book and sipping on a matcha latte.  At the register, in typical Madeline fashion, I asked a ton of questions.  The guy behind the counter was extremely patient with me, very knowledgable, and was visibly excited about the products at Dr. Smood, which is something I always love to see.  I wound up taking his recommendation to get the Wild Caught Salmon sandwich (smoked salmon, avo, tomato, vegan cream cheese, on the performance bread), and he even threw on some vegan homemade pesto for an added kick of flavor.  I also got an iced matcha latte, and, forgetting where I was, blurted out my default “unsweetened, please” part of my order.  To which he pleasantly replied with a smile, “Ma’am, we don’t sweeten anything back here.”  Music to my ears.

6

4

10

9

The sandwich was delicious, the portion size was perfect, and I can honestly say I was full for hours afterwards (which is very rare for me, especially after a sandwich).  I was so happy that, for dinner plans with my cousin a few days later, I insisted that we come here.  For my second time around, I got the vegan sandwich and added turkey to it, and tried the Hawaj White Coffee.  Since I had someone with me this time around, we also got the Organic Cinnamon Rolls to share.  The sandwich was just as delicious and satisfying as the first one, and the coffee was really tasty and spiced in such a unique way.  The cinnamon roll wasn’t your typical ooey gooey bun, but was definitely tasty and satisfied my post-meal sweet tooth.

11

12

13

Overall, Dr. Smood is definitely a place I can see myself becoming a regular at.  It’s a little pricey, but definitely very reasonable for a dinner in NYC, especially taking into consideration the quality of food you’re getting.  In addition to sandwiches/salads/coffee/tea/pastries, they also sell juices, smoothies, and snacks like granola and veggie jerky.  I highly recommend, and I would love to hear your thoughts once you try it out!

Stay fit and fresh, all!

14

EASY 1 Carb Protein Waffles

EASY 1 Carb Protein Waffles

I love waffles just as much as the next brunch-loving New Yorker, but I never get them because I just can’t justify all of those carbs (and, real talk, there are so many cheat meal options out there that I never settle on waffles).  I’m on a life mission to master the art of healthy eating, and this means giving in to our cravings sometimes.  That’s why I love finding and making recipes with healthier ingredients that mimic the epic cheat meals we REALLY want to be eating.  I’m not sure if this one was inspired by my southern road trip (where I shamelessly experienced arguably the best waffles ever), but I think I have perfected the protein waffle, and I’m so excited to share it with you!

Final 1

Let me preface with the following disclaimer: this will NOT be lightest, fluffiest, most delicious waffle you ever have.  Actually, it’s quite dense, and will taste mostly like the protein powder flavor you use to make it.  It is, however, a warm, tasty, and satisfying alternative to the monster that is a real official waffle.  It’s also a way better alternative to frozen waffles, in my opinion.  And it takes literally less than 10 minutes to make.  Ok, now that we’ve been completely honest with each other, let’s get started!

Ingredients:

  1. 1 scoop protein powder (I used PEScience in this recipe because it mixes the best of all other proteins I have used, but I also love using Rootz Nutrition as well!)
  2. 1 whole egg (You can add an additional white to achieve desired consistency)
  3. 1/8 tsp baking powder
  4. Water, for desired consistency
  5. Cinnamon (optional)
  6. Coconut oil (or whatever oil you want to use to coat the waffle iron)

Ingredients 2

Instructions:

  1. Start heating up your waffle iron.
  2. Mix the protein powder into a bowl with the baking powder and cinnamon.  You can just use a fork to mix.  Add the egg, and start to mix until the egg becomes dry.  Note that your egg will become dry before all protein powder is incorporated.  This is fine; queue water for consistency.
  3. Add water, one tbsp at a time, until the batter becomes waffle consistency.  This means that it will be runny, but not watery.  I usually add 3 tbsp of water for this desired consistency.
  4. Oil your waffle iron with coconut oil.  I use a cooking paintbrush to do this.
  5. Pour batter into the heated waffle iron, starting in the middle, and once you’re out of batter use a silicon spatula or the back of a spoon to smooth out the batter until the waffle iron is coated pretty evenly.  Work fairly quickly, because the bottom of your waffle is cooking!
  6. Close the iron, and cook according to your iron’s instructions.  Since these waffles have different ingredients than a traditional waffle, it might take a shorter amount of time than suggested.  Mine usually cooks within a minute or minute and a half.
  7. Open up the iron once it’s done, use a fork to carefully remove the waffle, and dress it up however you fancy!

How many times did I just say ‘iron’ and ‘waffle’?

Warning: the next few photos will not be cute, because it’s difficult to make protein powder mixed with eggs and water look nice. Consider yourself warned.  But persevere, because stats for this waffle are below 🙂

ingredients 1

Making 1

Making 2

Making 3

Stats (this recipe makes 1 serving): Protein – 30g; Carbs – 1; Fat – 6; Calories – 180.

When I made this waffle, I ate it plain because it was just a quick snack before the gym.  I do strongly recommend, however, adding toppings because otherwise it’s dense and dry.  My favorite is to add sunnyside eggs.  You can also add fruit, whipped cream, chocolate sauce, nuts, nut butter, etc.  Get creative with it!  You can even play around with the protein powder flavors you use to complement your favorite toppings (peanut butter waffle topped with banana and chocolate sauce anyone?)

I hope you guys try out this super easy protein-packed recipe.  These waffles are tasty, satisfying, and make a simple snack into something a bit more fun and interesting.  I would love to see what amazing waffle creations you made with this simple recipe, so tag me @liftinluxe #liftinluxe in your photos!

Stay fit and fab, all!

Final 2

With egg 2

Homemade Tacos

Homemade Tacos

I immediately lose trust in someone if they say they don’t like tacos.  Ok, I’m exaggerating, but seriously who doesn’t love a good taco?  Mexican food is actually a huge weakness of mine, and I have a love-hate relationship with Mexican restaurants because there’s so much potential for tag-along calories with your delicious Mexican meal.  How easy is it to fill up on guac and chips while you’re waiting for your tacos, then knock back your whole plate of tacos cause they’re just so damned delicious?!  Was there guac on the tacos too?  A creamy drizzle?  Sour cream?  Probably all of the above.  Then there’s the cheese, tortilla, and tag-along fats that come with cooking the meats and veggies. How about that side of rice and beans, though?  Are you salivating yet?  I know I am.

I thought that there must be a better way to enjoy tacos on the reg without having to make it my cheat meal every single week.  And alas, there was!  I made my own tortillas, slashing the carbs down significantly, and my own avocado sauce to drizzle, cutting down the fats by a whole lot.  Also, a solid benefit of making my own tacos at home was that I got to choose what to make on the side – AKA, no rice and beans sitting inches away from my fork to tempt me!

First, I’ll start with the taco recipe.  It was so so so easy.

Ingredients:

  1. 1/4 cup coconut flour
  2. 3 eggs
  3. 1 cup almond milk
  4. Coconut oil

Instructions:

  1. Whisk together the coconut flour, eggs, and almond milk until well combined.  Let the batter sit for a minute or two to thicken.  The batter should be runny, so add additional egg/almond milk in equal parts if need be to get it to a nice pourable consistency (I didn’t have to add anything extra when I made them).
  2. Heat a pan or skillet on the stove over medium heat and grease lightly with coconut oil
  3. Pour about 1/4 cup of batter into your pan or skillet and immediately swirl the batter around by tilting the pan to spread it out evenly.
  4. Cover the pan for about 2-3 minutes while the tortilla cooks.  When it’s golden and curled up a little on the edges, it’s ready to flip.  It should come up easily and should also be nicely golden on its pan side.  If it doesn’t come up easily when you try to flip it, it’s not done.
  5. Cook for another 2 minutes on the other side (or until golden brown)
  6. Keep going until you’ve used up all the batter.

This recipe made about 6 tortillas, and the leftovers stayed really well in the fridge until the next day.

1

Now for the fillings.  I cooked up some chicken and beef seasoned with cumin, smoked paprika, chipotle pepper powder, and pepper and set it aside.  Then, I cut up some tomatoes, onion, and cilantro and combined it in a bowl.  I took an oz of goat cheese out of the fridge and set that aside.  I washed some lettuce and set that aside as well.  Lastly, I made the most bomb avocado lime dressing to put on my tacos (and to save as a salad dressing for the rest of the week).

Ingredients:

  1. 100g avocado
  2. Juice from 2 limes
  3. Salt
  4. A splash of apple cider vinegar
  5. 1/2 cup greek yogurt
  6. 1 cup almond milk

Instructions:

  1. Blend all of the ingredients in a food processor or blender
  2. Store in an airtight container.  The top layer will get brown after a day, but it will stay fine in your fridge for at least four days.

This recipe yielded 1 cup of dressing, and I decided that a serving would be 2 tbsp (1/8 of the entire recipe.)  The macros for a serving of the dressing are: P – 2; C – 2; F – 2.5.  40 calories! If you want a thicker dressing, use less of the liquid ingredients.

3

Once all of this was prepared, I assembled my tacos and then devoured them!  They were honestly just as satisfying as the real deal.  And didn’t leave me overstuffed and bloated like a typical trip to my favorite Mexican restaurant.

Added bonus, I used the leftover tortillas the next day and made a really delicious dessert by spreading greek yogurt, honey, and cinnamon on them and rolling them up.  It was almost like a crepe, and it was an equally as delicious way to enjoy those homemade tortillas.

Stay fit and fiesta, all!

2